At the top of the Shore Application is four main tab options.
The top right corner houses the user’s notifications, their sign in email, and an icon that shows the server connection. (Green means you are connected, yellow means that the server connection is trying to be established, and red means no connection)
Creating Files/Folders #
Find the Files tab along the top menu bar

The files page contains three panels: left, centre, and right. Each panel can be resized by left clicking & dragging on the boundaries between them. The panels can also be quickly hidden by hitting the push pin button.

The left panel contains a collapsible and expandable tree structure. Left clicking on a folder will expand or collapse it. If the user right clicks they can modify the folder or its contents.
Most of the options are pretty straight forward like creating a New Form Repository, Copy Properties, and Delete.
Link to this Document creates a unique URL for the specific folder.
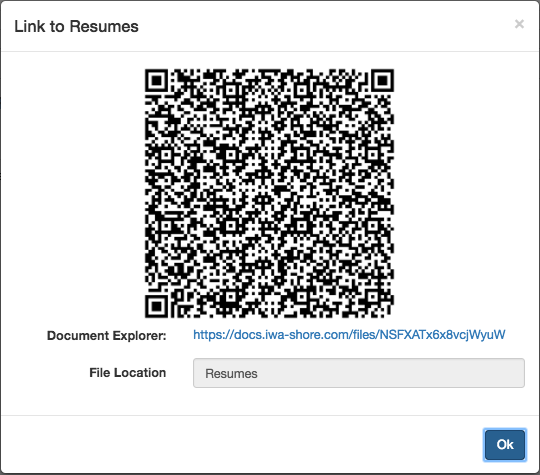
Landing Page creates a QR code that can also be clicked on to take the user to a page where the selected folder is previewed.
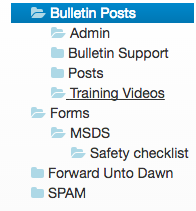
A subordinate folder can be added to the parent folder by highlighting the first folder made and right clicking on it. Choose the new folder option to create a subordinate folder. The subordinate folders are always indented from a master folder.
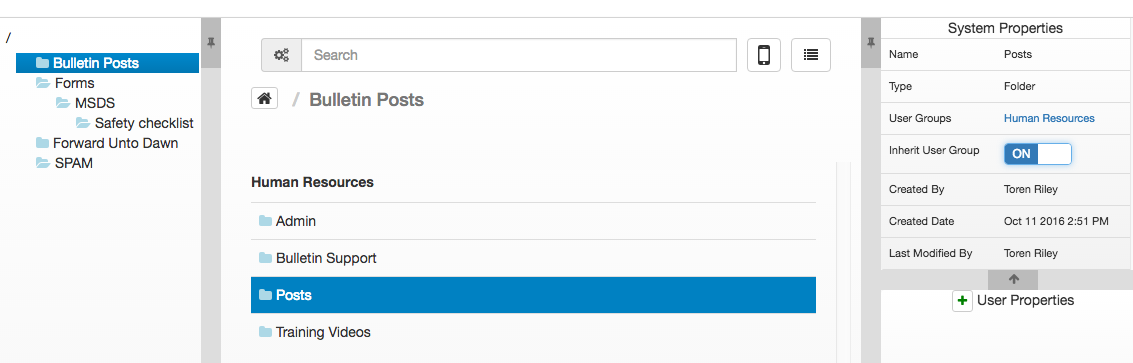
Bulletin Posts is the name of the parent folder
Bulletin Support is one of the subordinate folders
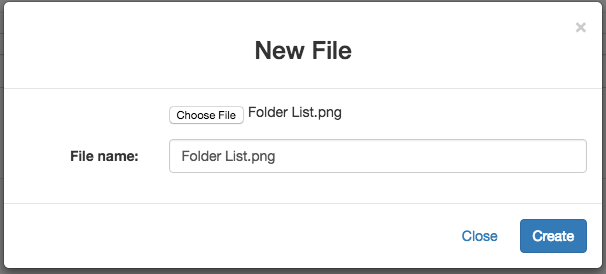
Creating a new file is done similar to adding a new folder. The user just right clicks on the new folder and selects New File. The user then decides on a file from their machine.
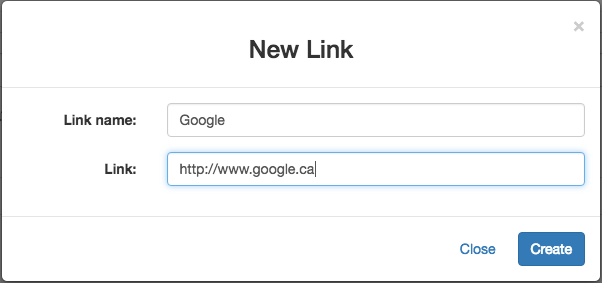
The user may link a website in any folder or in the database using a hyperlink. Right click on the common slash/folder and choose the New External Link button.
A form repository may also be added to the database. More information in this link => Repositories.
The centre panel shows the contents of the folder that is selected in the left panel. Double left clicking a file will cause it to download. The centre also contains the search bar. Files and folders can be dragged and dropped into different repositories and sections of the database. When uploading a file into a folder from a mobile device you can capture pictures and videos right off the device camera. 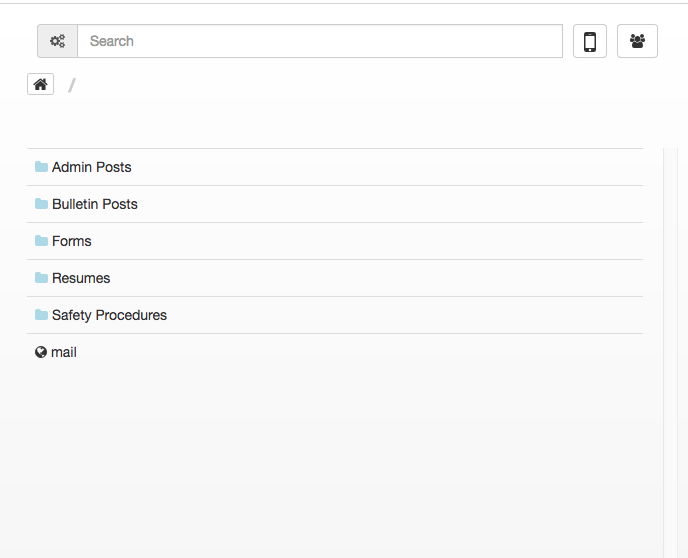
Right clicking on the files or folders allows users to modify the contents.
A form repository has different modifying options then the rest. The user can perform a bulk upload which allows the user to upload several forms to the repository. They can also bulk fill out the entries which allows fields to filled out en-masse.
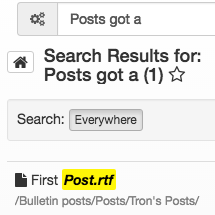
The search is a great way to locate information the user are looking for within the database. The search works similar to search engines like Bing or Google. Just type some keywords into the search box and hit enter.

The search bar contains an advanced search option where the user searches with multiple or singular words/phrases to locate the file/folder. The user may also choose words to exclude and if a file is found with those it does not get returned by the search.

After the advanced search only the specific file(s) are returned to the user. If the user wants to save the search for another time they just hit the star beside the search name. The user is asked to name the saved search. This allows the user quick access for the next time the user searches for those parameters.
For a quick way to get back to the top of the database tree or to clear the search easier, use the home button beside the name of the parent folder.
At the end of the search bar there are two buttons. 
The button with the mobile phone icon is for switching from desktop to mobile view.
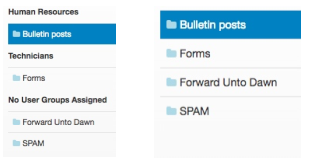
The second button allows the user to sort the files and folders into their respective groups. Groups are a great way to isolate users into specific categories or projects (ex. Human Resources and Technicians).
**On a side note the user will be disconnected from the server when they select a different tab within the browser or if they remain inactive for 60 seconds. The connection will be re-established almost instantly.**
Properties and Relationships #
The right panel displays the properties of whatever was last clicked on and highlighted in the left or centre pane. This gives users a bit of information without leaving the main database page.
System Properties are for the most part decided by the software although, some of them are configured by the user. User Properties are added and edited manually.
**Configure properties in Administration Console.**
System Properties #
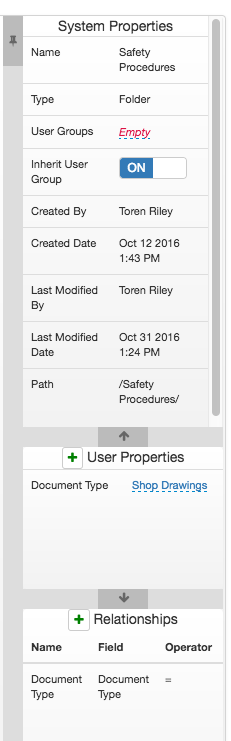
System Properties gives the users a basic understanding of the file in question. Telling the user some minor details like the type of file, when it was created, and when it was last modified. Different types of files can have different types of properties associated with it. An example is a folder will not show a “word count” or “file size” but the document inside the folder does show those.

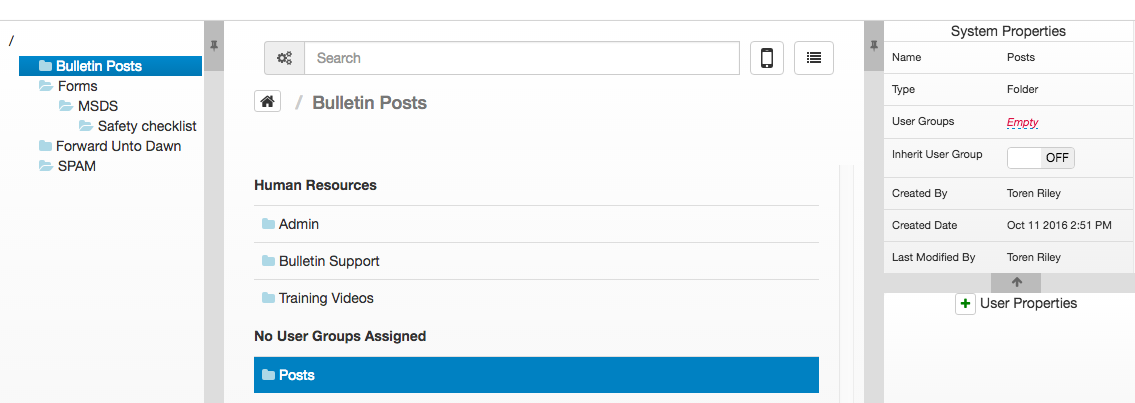
User groups is left empty until the user determines what group the file should be in. If the file/folder has a group selected the user must be a part of that group to see the contents.
The user can see “Bulletin Posts” because they are a part of the group “Human Resources”. However if the user was removed from the group, “Bulletin Posts” would no longer be visible.
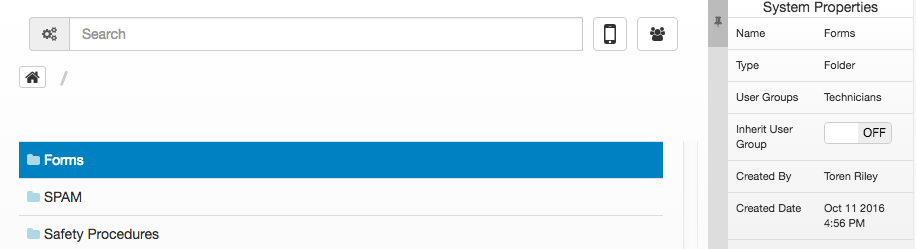
In the case that Inherit User Groups is switched on and a parent folder has a group set to “Human Resources”. When the user creates a new subordinate folder, the child folder will then inherit the group of the parent.
However if the user switches the subordinate folder off of Inherit User Group and remove the user group the subordinate folder is no longer in “Human Resources”. This can be modified at any point.
Form Repository System Properties #
System properties with form repositories adds a few more options. These system properties are set manually by the user.
Fields Shown- Allows users to decide what fields are shown by default when entering the form repository.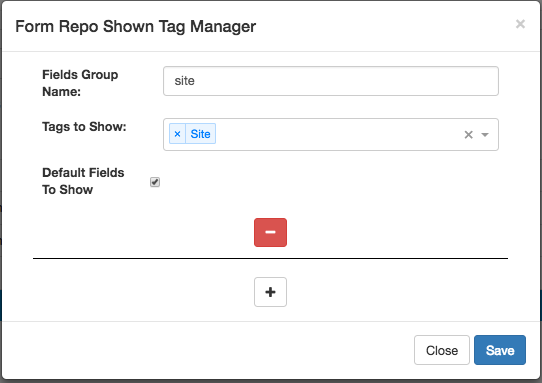
Form Approvers- Allows users to select what groups have authority to approve the submission of a form within a repository. If no group is selected any user with permissions on the database can approve the form.
One approver can be required. The approver does not have to be a part of all the groups chosen. Any number of groups can be chosen to approve the forms.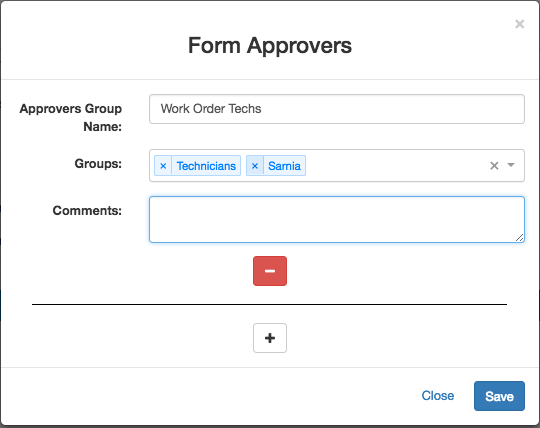
Multiple approvers can be required. This requires the user to get approval from each group and the users must be unique.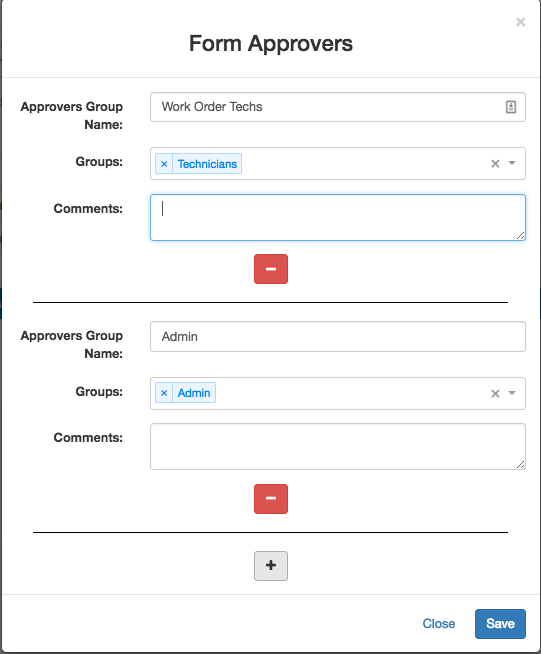
Notify On Submission- The user decides when a form is submitted who gets notified if anyone.
Shared With- Allows users of a particular group to allow other groups access to their forms with or without editing access.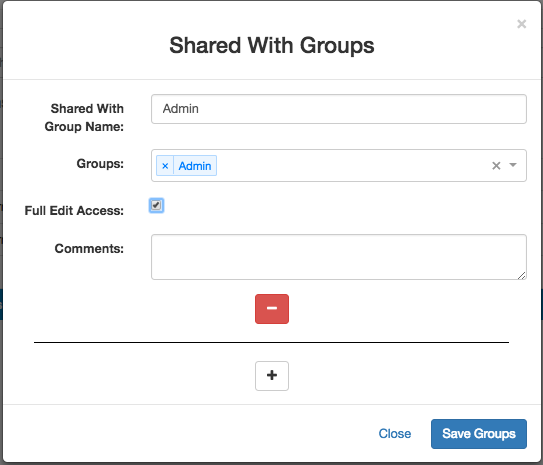
User Properties #
User properties can be changed at any time by a user with permissions to do so. Super Users can add or remove user property types in the admin console.
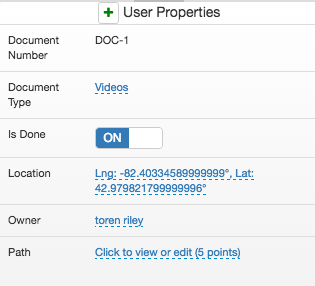
Document Number labels the file or folder with a unique identifier that increments by one for every file labeled.

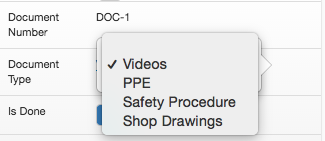
Document type allows the user to add a label to define what kind of file or folder the user is dealing within the database. A drop down list appears when the user left clicks on the Document Type field to choose from. The list can be changed from the admin console with proper permissions.
Is Done is a feature that lets the user mark folder or file as completed (On=True, Off=False).

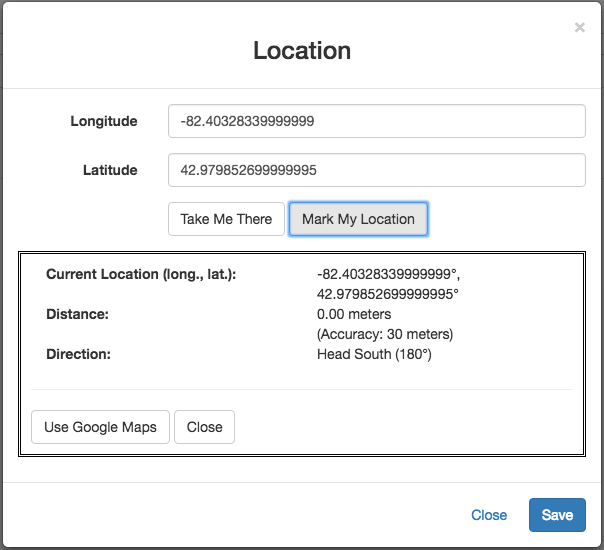
Location gives the user GPS co-ordinates of where the user want the file or folder to be linked to. It can be used with location technology or a location can be manually chosen from google maps.
Owner is the name of a user or company in charge of the file/folder.

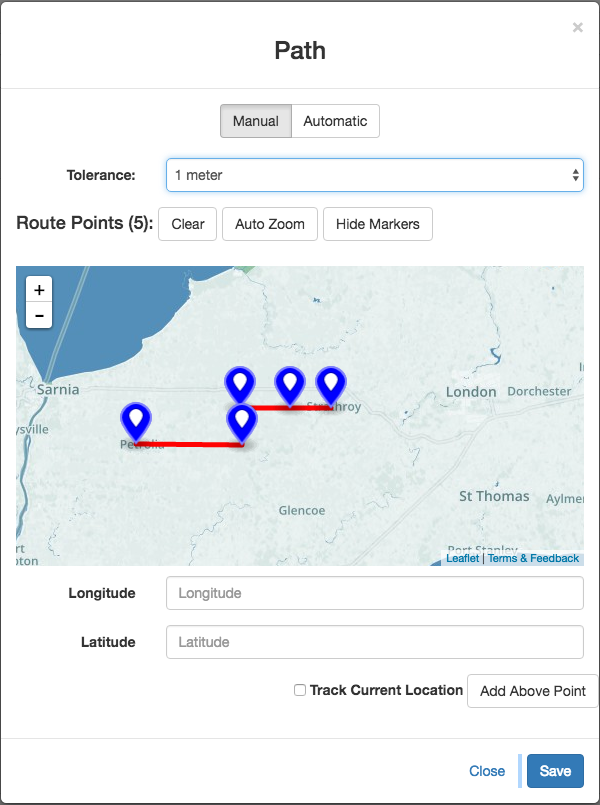
Path is shown on a map with several points of reference. It allows the user to plot a route with the mouse or by knowing the GPS co-ordinates. Path also has a setting to change the distance the user can veer off the given course called “Tolerance”.
Relationships #
**Configure relationships in Administration Console**
Relationships are a great way to link files/folders to each other within Shore. Any object that is being shown as a relationship has a green coloured icon beside it.

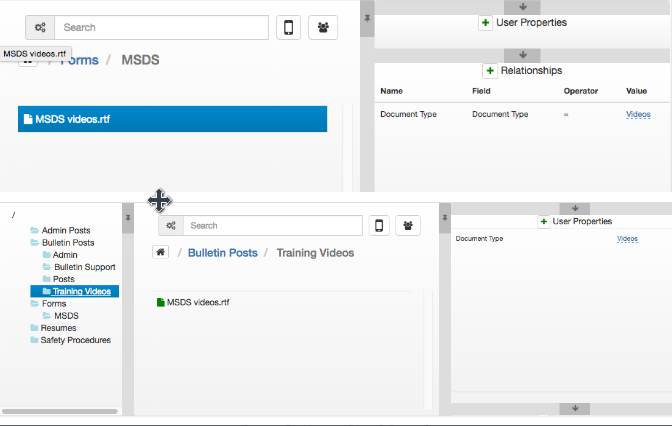
In the example below the user would like to make a relationship between the folder “Training Videos” and the file “MSDS videos”.
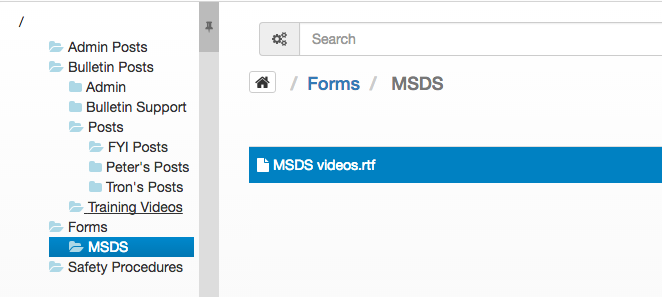
Using the Document Type User Property the user added the tag “Videos” to the “Training Videos” folder to define it.

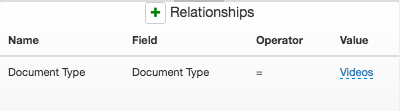
The user then locates the “MSDS” folder and left clicks the “MSDS videos” file. On the relationship panel on the right hand side the user left clicks and add a Document Type relationship from the drop down menu select “Videos”.
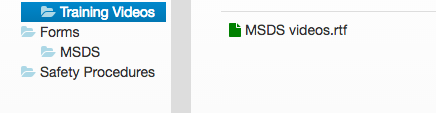
The “Training Videos” folder now shows the “MSDS videos” file from within it. This gives the user a quick way to access the “MSDS videos”. The relationship does not go both ways as the user can’t see “Training Videos” from the “MSDS” folder.
The folder where the user wants the relationship files to be found uses the user property panel to define it. The file that will be shown in that folder uses the relationship panel on the right hand side to make a connection.